
Wednesday, July 19, 2023

Kutabs....Comida de Azerbaiyán


Me encantan los gozleme, los probé por primera vez en Kuwait, y tan pronto como encontré una receta, comencé a hacerlos en casa. Estaba viendo un documental sobre Azerbaiyán, y mostraban un plato similar llamado Kutabs... Inmediatamente, comencé a buscar una receta... y aquí está... un delicioso Kutab que ahora puedo disfrutar ¡en casa! Masa 500gr Harina 280 ml de agua hirviendo 1 cucharadita Sal 4 cucharadas de aceite de oliva Relleno: 450 gr de una mezcla de verduras. Usé cebollas verdes, cebollines, eneldo, cilantro, perejil, acelgas y espinacas. 80g Mantequilla temperatura ambiente 1 cucharadita de sal Queso En un bol mezclar la sal, el aceite y el agua caliente. Agregue la harina y amase durante 10 minutos hasta obtener una masa suave y sedosa. Colóquelo en un recipiente, tape y déjelo reposar durante 30-45 minutos. Picar todas las verduras y colocarlas en un bol. Sazone con sal y mantequilla. Dividir la masa en 6 bolas, y con un rodillo, aplanarla muy fina en forma de círculo. Coloque el relleno de verduras y agregue queso encima. Ciérralo por la mitad. Pellizque los bordes juntos. Calentar una sartén antiadherente sin nada de aceite. Cocine 2 minutos por ambos lados. Píntalo con mantequilla. ¡¡DISFRUTAR!!


Kutabs food from Azerbaijan


I love Gozleme, I tried them for the first time in Kuwait, and as soon as I found a recipe, I started making them at home. I was watching a documentary about Azerbaijan, and they showed a similar dish called Kutabs.....Immediately, I started to look for a recipe...and here it is.....a delicious Kutab that now I can enjoy at home!

Dough

500 gr Flour 280 ml Boiling water 1 tsp. Salt 4 tbsp Olive oil Filling: 450 gr of a mix greens. I used green onions, chives, dill, cilantro, parsley, swiss chard and spinach. 80g Butter room temperature 1 tsp Salt

Cheese In a bowl mix the salt, oil and hot water. Add the flour, and knead it for 10 minutes until you have a smooth and silky dough. Place it in a bowl, cover and let it rest for 30-45 minutes.
Chop all the greens, and place it in a bowl. Season it with salt and butter. Divide the dough in 6 balls, and with a rollin pin, flatten it very thin in a circle shape. Place the filling of greens and add cheese on top.vClose it in half. Pinch the edges together. Heat a non-stick pan without any oil. Cook it 2 minutes on both sides. Brush it with butter. ENJOY!!


Sunday, July 16, 2023

Danish de Queso


Parece que este año me decanté por las Viennoiseries... hojaldres, croissants, cornettos y ahora danish de queso .

Tengo que reconocer que esta danish de queso estaba buenísima, pero un poco pesada para mí. Los volví a hacer con frutas y crema de vainilla y quedaron perfectos, pero esa receta será para el próximo post.

  Receta danish de queso de este enlace de youtube

Ingredientes
250 g de harina de pan o harina alta en proteínas
5 g de sal
35 g de azúcar granulada
5 g de levadura seca
30 g de mantequilla
130 g de leche entera
125 g de mantequilla para laminar

relleno de queso
200 g queso crema tierno
50 g de azúcar granulada
1/4 cucharadita de pasta de vainilla
1 huevo
1 pizca de sal

Relleno de queso: con una batidora de mano, mezcle todo y reserve.


Masa danish: En un bol, colocar todos los ingredientes para la receta de la masa excepto la mantequilla para laminar. Amasar durante 10-12 minutos. Colóquelo en un recipiente cubierto con una tapa y déjelo en el refrigerador durante la noche o 12 horas.

Tome un trozo de papel pergamino y coloque 125 g de mantequilla fría en el medio. Dóblalo, y con un rodillo, haz un cuadrado de 12*12 cm. Coloque la mantequilla cuadrada en la nevera.

Saca la mantequilla y la masa de la nevera. Extienda la masa en forma de rectángulo, de modo que la longitud sea el doble de la mantequilla. Coloque la mantequilla en el centro de la masa. Dobla los lados de la masa hacia el centro y sella todos los bordes.

Primer y segundo pliegue: Con un cuchillo, haz un corte a la izquierda y otro a la derecha de la masa. Con el rodillo, crea una masa rectangular larga. Dóblalo en tercios. Tápalo y colócalo en la nevera durante 30-45 minutos. Repita el mismo proceso y deje reposar la masa nuevamente durante 30-45 minutos.

Masa final: Saque la masa de la nevera y con un rodillo cree un rectángulo de 33 x 22 cm (13 x 9 pulgadas). Divida la masa en 6 piezas cuadradas de 10 x 10 cm (4 x 4 pulgadas). Déjalos reposar en la nevera durante 15 minutos.
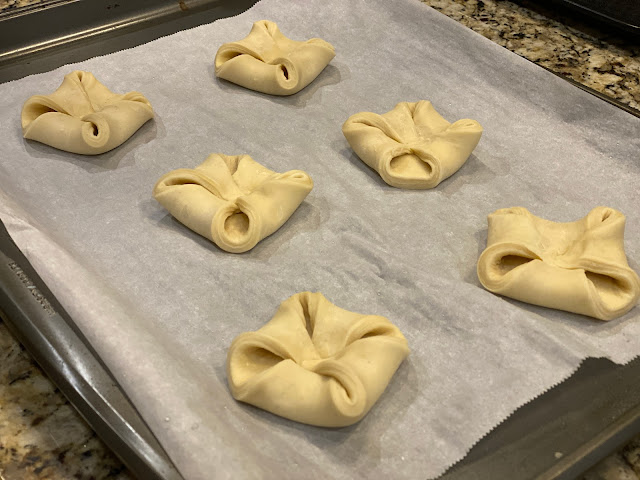
Da forma a la danesa: rocía un poco de agua sobre el cuadrado, luego dobla las esquinas hacia el centro y presiona la punta hacia abajo. Repita los pasos para cada danés. Colóquelos en una bandeja para horno con papel pergamino de horno.
Prueba y horneado: Coloque los daneses en un área tibia (los coloqué dentro del horno, pero el horno estaba apagado) durante 2 a 3 horas o hasta que dupliquen su tamaño. Una vez que hayan alcanzado el tamaño, sáquelos del horno y precaliente el horno a 180C (356F).

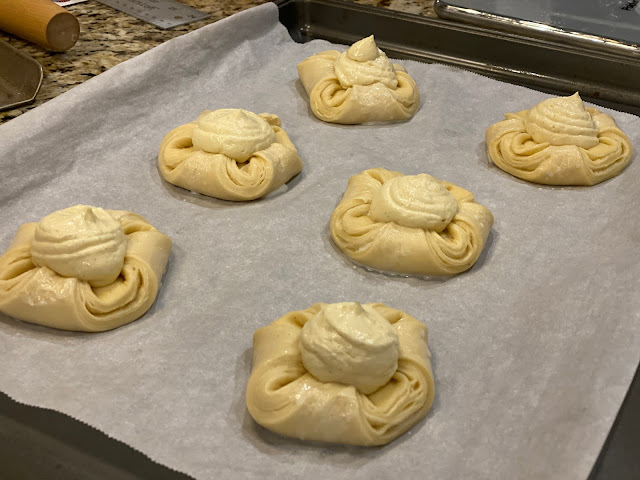
Coloque el queso crema en el medio. Hornéalas durante 15-20 minutos hasta que estén doradas. Glasear con almíbar o mermelada. ¡¡DISFRUTAR!!




Cheese Danish


It seems that this year I went for the Viennoiseries...puff pastry, croissants, cornettos, and now cheese danish.

I have to admit that this cheese danish was very good, but a little heavy for me. I made them again with fruit and vanilla cream pastry and they were perfect, but that recipe will be for the next post.


Ingredients
250 g bread flour or high protein flour
5 g salt
35 g granulated sugar
5 g dry yeast
30 g  butter
130 g full-cream milk
125 g butter for lamination

Cheese Filling
200 g soft cream cheese
50 g granulated sugar
1/4 tsp vanilla paste
1 egg
1 pinch salt

Cheese filling: with a hand blender, mix all together, and set aside. 


Danish dough: In a mixing bowl,  place all the ingredients for the dough recipe except the butter for lamination. Kneed it for 10-12 minutes. Place it in a bowl covered with a lid, and leave it in the fridge overnight or 12 hours.

Take a piece of parchment paper and place 125g of cold butter in the middle. Fold it, and with a rolling pin, make a square of 12*12 cm. Place the square butter in the fridge.

Take the butter and the dough out of the fridge. Roll out the dough into a rectangle shape, so the length is double the butter. Place the butter in the dough middle. Fold the dough sides towards the center and seal all the edges.

First and second fold: With a knife, make a cut one to the left and the other to the right sides of the dough. With the rolling pin, create a long rectangle pastry. Fold it in thirds. Cover and place it in the fridge for 30-45 minutes. Repeat the same process, and let the dough rest again for 30-45 minutes.

Final dough: Take the dough out of the fridge, and with a rolling pin create a  rectangle of 33 x 22cm (13 x 9in). Divide the dough into 6 square pieces 10 x 10cm (4 x 4in). Leave them in the fridge to rest in for 15 minutes. 
Shape the danishe: Spray little bit of water over the square, then fold the corners o the center and press the point down. Repeat the steps for every danish. Place them on a oven proof tray with parchment paper. 
Proofing and baking: Place the danishes on a warm area (I place them inside the oven, but the oven was off) for 2 to 3 hours or until they are double in size. Once they have reached the size,  take them out of the oven, and preheat the oven to 180C (356F).  

Place the cream cheese in the middle. Bake them for 15-20 minutes until they are golden brown. Glaze with syrup or jam. ENJOY!!


Thursday, July 13, 2023

Pasta de Ajo y Chiles Asiatico


Todo empezó con dos o tres semillas... y ahora tengo un mini árbol de chiles!!

Después de comerlos frescos, terminé con 250 gramos de deliciosas vainas de chile Tailandés. Hice una pasta de ajo y chile para agregar a mis salteados asiáticos.


Pasta De Ajo y Chiles

250 gramos de vainas de chile lavadas y sin tallos
4 ajos enteros
3 cucharadas de salsa de soja oscura
2 tazas de aceite de oliva

Pelar los ajos, y en un mini procesador picarlos. Agréguelos a una sartén con 1/2 taza de aceite de oliva y cocine a fuego lento durante 3 minutos. Tenga cuidado de no quemarlos.


En una mini licuadora, picar los chiles. Agregue el aceite de oliva restante a la sartén y agregue los chiles. Cocine a fuego lento durante 5 minutos. Agregue la salsa de soya y apague la estufa. Colóquelo en un frasco de vidrio limpio. Lo como con todo, incluso sándwiches y mayonesa. ¡DISFRUTAR!


Garlic Chili Paste


Everything started with two or three seeds....and now I have a chili mini tree!!

After eating them fresh, I ended up with 250 grams of delicious Thai chili pods. I made a garlic chili paste to add to my Asian stir fries.


Garlic Chili Paste

250 grams of chili pods washed and without ant stem
4 whole garlics
3 tablespoons dark soy sauce
2 cups olive oil

Peel the garlics, and in a mini processor chop them. Add them to a pan with 1/2 cup of olive oil, and simmer it for 3 minutes. Be careful to don't burn them.


In a mini blender, chop the chilis. Add the remaining olive oil to the pan, and add the chilis. Simmer them for 5 minutes. Add the soy sauce, and turn off the stove. Place it in a clean glass jar. I eat it with everything, including sandwiches and mayonnaise. ENJOY!